Free Shipping on Orders Above ₹499
Same Day Delivery Available in Pune & PCMC
Cash on Delivery (COD) Available
Read Our Shipping Policy
Free Shipping on Orders Above ₹499
Same Day Delivery Available in Pune & PCMC
Cash on Delivery (COD) Available
Read Our Shipping Policy

Temperature Sensor (Thermistor)
2 min read
In this project, we’ll learn how to measure temperature using a thermistor and Arduino.
A thermistor is a special type of resistor whose resistance changes according to temperature.
There are two main types of thermistors:
- NTC (Negative Temperature Coefficient)
- PTC (Positive Temperature Coefficient)
In this project, we commonly use an NTC thermistor, where:
- Temperature increases → Resistance decreases
- Temperature decreases → Resistance increases
The Arduino reads these changing values and converts them into temperature readings.
This project introduces important concepts like:
- Temperature Sensing
- Analog Input
- Voltage Divider Circuit
- Sensor Reading
- Real-World Data Measurement
In simple words:
The thermistor senses temperature changes, and the Arduino converts those changes into readable values.
Required Components #
- Arduino UNO × 1
- NTC Thermistor × 1
- 10kΩ Resistor × 1
- Breadboard × 1
- Jumper Wires × several
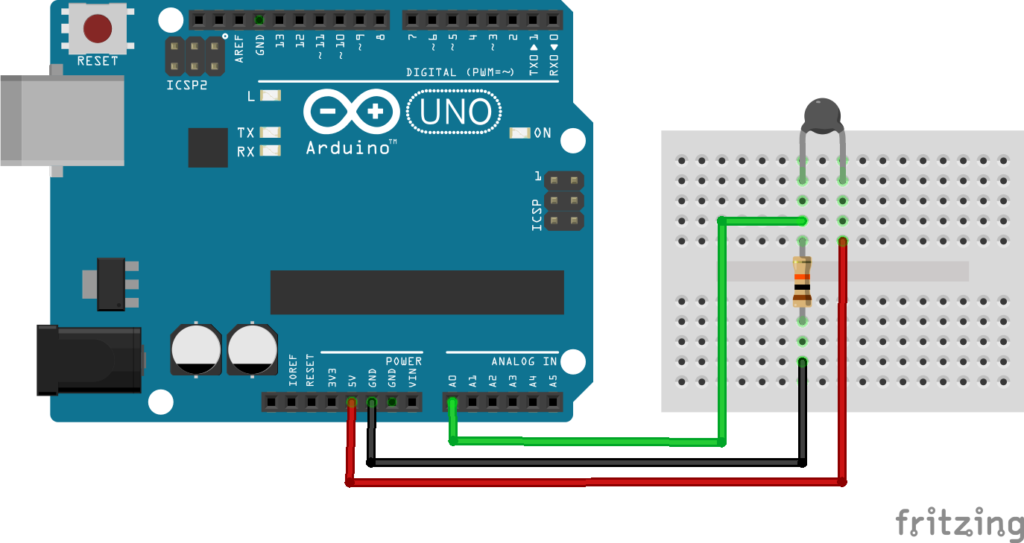
Explanation #
The thermistor is connected in a voltage divider circuit along with a 10kΩ resistor.
Connections:
- One side of the thermistor → 5V
- Other side → Arduino analog pin A0
- 10kΩ resistor connected between A0 and GND
This arrangement creates a changing voltage depending on temperature.
As temperature changes:
- Thermistor resistance changes
- Voltage changes
- Arduino reads different analog values
The Arduino reads this voltage using: analogRead()
The analog value is then converted into resistance.
After that, the Arduino uses the Steinhart-Hart equation to calculate the temperature in Celsius.
In simple words:
The Arduino measures how much the thermistor resistance changes and converts it into temperature.
Program #
#include <math.h>

int thermistorPin = A0;

float resistance;
float temperature;

const float seriesResistor = 10000.0;
const float nominalResistance = 10000.0;
const float nominalTemperature = 25.0;
const float betaCoefficient = 3950.0;

void setup()
{
    Serial.begin(9600);
}

void loop()
{
    int adcValue = analogRead(thermistorPin);

    resistance = seriesResistor * (1023.0 / adcValue - 1.0);

    temperature = resistance / nominalResistance;
    temperature = log(temperature);
    temperature /= betaCoefficient;
    temperature += 1.0 / (nominalTemperature + 273.15);
    temperature = 1.0 / temperature;
    temperature -= 273.15;

    Serial.print("Temperature: ");
    Serial.print(temperature);
    Serial.println(" °C");

    delay(1000);
}
Figure 1.2: Thermistor Program
Code Explanation #
Including Math Library:
#include <math.h>This library is needed because the code uses logarithm calculations for temperature conversion.
Thermistor Pin:
int thermistorPin = A0;The thermistor is connected to analog pin A0.
Thermistor Constants:
const float betaCoefficient = 3950.0;This value is used to calculate temperature accurately.
Different thermistors may have different beta values.
Reading Analog Value:
int adcValue = analogRead(thermistorPin);The Arduino reads the voltage from the thermistor circuit.
The value ranges from:
0→ 0V1023→ 5V
Calculating Resistance:
resistance = seriesResistor * (1023.0 / adcValue - 1.0);This converts the analog value into thermistor resistance.
Calculating Temperature:
temperature = log(temperature);The Arduino uses the Steinhart-Hart equation to calculate accurate temperature values.
This is one of the most commonly used thermistor equations in electronics.
Printing Temperature:
Serial.println(" °C");The calculated temperature is displayed on the Serial Monitor.
Working Principle #
The thermistor changes resistance according to temperature.
This resistance change changes the voltage in the voltage divider circuit.
The Arduino:
- Reads the voltage
- Converts it into resistance
- Uses a mathematical equation
- Calculates temperature in Celsius
This process repeats continuously.
Real-Life Applications #
Thermistors are widely used in:
- Digital thermometers
- Air conditioners
- Refrigerators
- Battery temperature monitoring
- CPU cooling systems
- Medical devices
- Industrial automation
- Automotive electronics
Beginner Tips #
- Use a proper 10k NTC thermistor for accurate results.
- Loose breadboard connections may cause unstable readings.
- Different thermistors may require different beta values.
- Avoid holding the thermistor too tightly during testing.
- Small fluctuations in readings are normal.
✔ Challenges / Next Steps #
- Display temperature on an LCD.
- Add a buzzer for high-temperature alerts.
- Create an automatic cooling fan system.
- Send temperature data to a mobile phone using Bluetooth.
- Build a smart room temperature monitor.
- Convert readings into Fahrenheit.
Conclusion #
This project teaches how Arduino reads real-world temperature using a thermistor sensor.
You learned:
- How a thermistor works
- How analog sensing works
- How temperature is calculated
- How resistance changes with temperature
This project is an important step toward building:
- Smart monitoring systems
- Environmental sensors
- IoT temperature systems
- Automation projects
Temperature sensing is one of the most important and widely used applications in electronics and embedded systems.


