Free Shipping on Orders Above ₹499
Same Day Delivery Available in Pune & PCMC
Cash on Delivery (COD) Available
Read Our Shipping Policy
Free Shipping on Orders Above ₹499
Same Day Delivery Available in Pune & PCMC
Cash on Delivery (COD) Available
Read Our Shipping Policy

4X4 Matrix Keypad
3 min read
In this project, we’ll learn how to interface a 4×4 Matrix Keypad with Arduino and detect which key is being pressed.
A 4×4 keypad contains 16 buttons arranged in rows and columns:
1  2  3  A
4  5  6  B
7  8  9  C
*  0  #  D
Instead of using 16 separate Arduino pins, the keypad uses a matrix arrangement that requires only 8 pins.
This project introduces important concepts like:
- Digital Input
- Matrix Scanning
- User Input
- Key Detection
- External Libraries
In simple words:
The keypad allows users to send commands and data to the Arduino by pressing buttons.
Required Components #
- Arduino UNO × 1
- 4×4 Matrix Keypad × 1
- Breadboard (optional) × 1
- Jumper Wires × several
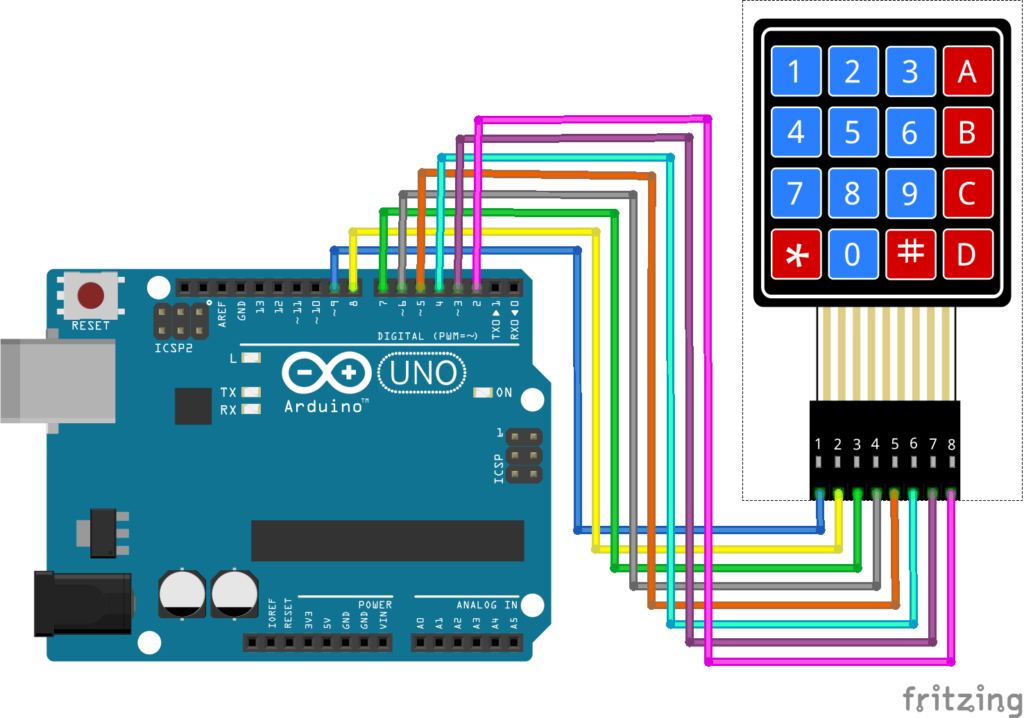
Connection Details #
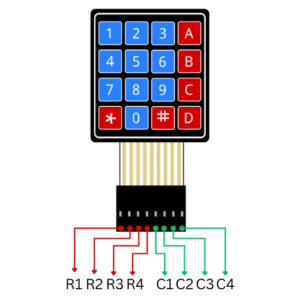
Most 4×4 keypads have 8 pins.
Connect them as follows:
| Keypad Pin | Arduino Pin |
|---|---|
| R1 | 9 |
| R2 | 8 |
| R3 | 7 |
| R4 | 6 |
| C1 | 5 |
| C2 | 4 |
| C3 | 3 |
| C4 | 2 |
The exact pin order may vary depending on the keypad manufacturer. Check the keypad datasheet if available.
Explanation #
A 4×4 keypad consists of:
- 4 Rows
- 4 Columns
When a key is pressed:
- One row connects to one column
- Arduino identifies the pressed key by scanning the rows and columns
This method is called Matrix Scanning.
Without the matrix arrangement:
- 16 buttons would require 16 Arduino pins
Using matrix scanning:
- Only 8 pins are needed
In simple words:
The Arduino continuously checks the rows and columns to determine which button has been pressed.
Installing the Keypad Library #
Before uploading the code:
- Open Arduino IDE
- Click Sketch → Include Library → Manage Libraries
- Search for:
Keypad
- Install the Keypad Library by Mark Stanley and Alexander Brevig
Program #
This simple code detects the pressed key and displays it on the Serial Monitor.
#include <Keypad.h>

const byte ROWS = 4;
const byte COLS = 4;

char keys[ROWS][COLS] =
{
  {'1','2','3','A'},
  {'4','5','6','B'},
  {'7','8','9','C'},
  {'*','0','#','D'}
};

byte rowPins[ROWS] = {9, 8, 7, 6};
byte colPins[COLS] = {5, 4, 3, 2};

Keypad keypad = Keypad(makeKeymap(keys), rowPins, colPins, ROWS, COLS);

void setup()
{
  Serial.begin(9600);
}

void loop()
{
  char key = keypad.getKey();

  if(key)
  {
    Serial.print("Key Pressed: ");
    Serial.println(key);
  }
}
Figure 1.2: Keypad Program
Code Explanation #
Creating the Key Layout :
char keys[ROWS][COLS]Defines the keypad layout.
This tells Arduino which character belongs to each button.
Defining Row Pins :
byte rowPins[ROWS] = {9, 8, 7, 6};Specifies the Arduino pins connected to the keypad rows.
Defining Column Pins :
byte colPins[COLS] = {5, 4, 3, 2};Specifies the Arduino pins connected to the keypad columns.
Reading a Key :
char key = keypad.getKey();Checks whether a key is pressed.
Displaying the Key :
Serial.println(key);Displays the pressed key on the Serial Monitor.
Working Principle #
The keypad continuously waits for a button press.
When a button is pressed:
- Row and column connect
- Arduino identifies the key
- The key value is returned
- The program performs the required action
How to Test #
- Upload the code.
- Open Serial Monitor.
- Set Baud Rate to
9600. - Press keypad buttons.
You should see:
Key Pressed: 1
Key Pressed: 5
Key Pressed: A
Real-Life Applications #
4×4 Keypads are used in:
- Door Lock Systems
- ATM Machines
- Security Systems
- Access Control Panels
- Calculators
- Home Automation
- Industrial Control Systems
Beginner Tips #
- Double-check keypad pin order before wiring.
- Install the Keypad library correctly.
- Use the Serial Monitor to test button presses first.
- If keys appear incorrect, verify row and column wiring.
- Avoid loose jumper wire connections.
✔ Challenges / Next Steps #
- Connect the keypad with an I2C LCD.
- Build a digital door lock.
- Add a buzzer for incorrect passwords.
- Create a calculator.
- Build a menu navigation system.
- Control relays using keypad commands.
Conclusion #
This project teaches how Arduino reads user input through a matrix keypad.
You learned:
- How matrix keypads work
- How matrix scanning works
- How to detect key presses
- How to create password-based systems
Matrix keypads are widely used in security, automation, and embedded systems, making them an excellent component for beginner and intermediate Arduino projects.


