Free Shipping on Orders Above ₹499
Same Day Delivery Available in Pune & PCMC
Cash on Delivery (COD) Available
Read Our Shipping Policy
Free Shipping on Orders Above ₹499
Same Day Delivery Available in Pune & PCMC
Cash on Delivery (COD) Available
Read Our Shipping Policy

Fade an LED (PWM)
3 min read
In this project, we’ll learn how to make an LED gradually fade IN and fade OUT using Arduino.
Unlike normal blinking where the LED is either fully ON or fully OFF, fading creates a smooth brightness transition that makes the LED appear brighter and dimmer slowly.
This effect is created using a technique called PWM (Pulse Width Modulation).
PWM allows Arduino to simulate analog output using digital pins by rapidly switching the LED ON and OFF at different speeds.
This project introduces important concepts like:
- PWM (Pulse Width Modulation)
- Brightness Control
- Analog-like Output
- Smooth LED Effects
- Arduino PWM Pins
In simple words:
The Arduino changes how long the LED stays ON during very tiny time intervals, making our eyes see different brightness levels.
Required Components #
- Arduino UNO × 1
- LED × 1 (any color)
- 220Ω Resistor × 1
- Breadboard × 1
- Jumper Wires × several
Explanation #
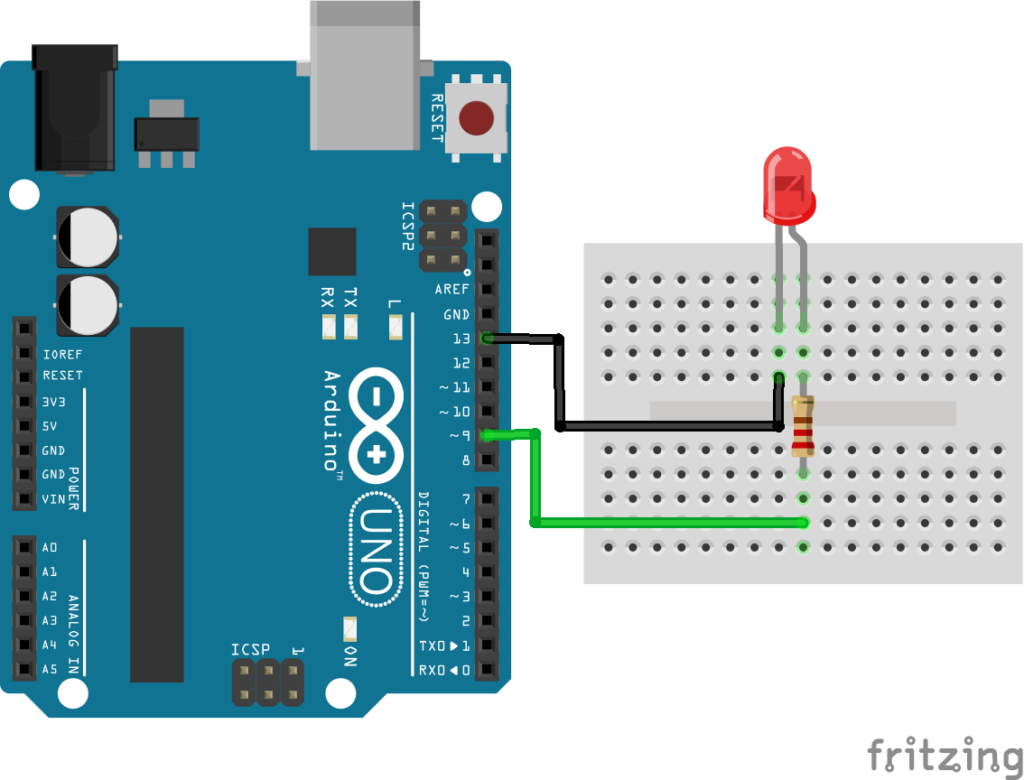
Connect the anode (long leg) of the LED to Arduino digital pin 9 through a 220Ω resistor.
Connect the cathode (short leg) of the LED to GND.
Pin 9 is used because it is a PWM-enabled pin.
PWM pins on Arduino UNO are marked with the " ~ " symbol.
In the Arduino code, we use: analogWrite()
to control LED brightness.
The PWM value can range from:
0→ Fully OFF255→ Fully ON
Values in between control different brightness levels.
Example:
50→ Dim light128→ Medium brightness255→ Maximum brightness
The Arduino gradually increases and decreases these values, creating a smooth fading effect.
In short:
The Arduino rapidly turns the LED ON and OFF at different speeds, making it appear brighter or dimmer to our eyes.
Program #
int ledPin = 9;

void setup()
{
    pinMode(ledPin, OUTPUT);
}

void loop()
{
    // Fade IN
    for(int brightness = 0; brightness <= 255; brightness++)
    {
        analogWrite(ledPin, brightness);
        delay(10);
    }

    // Fade OUT
    for(int brightness = 255; brightness >= 0; brightness--)
    {
        analogWrite(ledPin, brightness);
        delay(10);
    }
}
Figure 1.2: Fading LED Program
Code Explanation #
Defining LED Pin
int ledPin = 9;This stores the PWM pin connected to the LED.
setup()
pinMode(ledPin, OUTPUT);This tells the Arduino that the LED pin will work as an output pin.
analogWrite()
analogWrite(ledPin, brightness);This controls the LED brightness using PWM values.
Fade IN Loop
for(int brightness = 0; brightness <= 255; brightness++)This gradually increases the brightness from OFF to maximum brightness.
Fade OUT Loop
for(int brightness = 255; brightness >= 0; brightness--)This gradually decreases the brightness from maximum brightness to OFF.
Delay
delay(10);This small delay controls how smooth and fast the fading effect looks.
Working Principle #
The Arduino continuously:
- Increases LED brightness slowly
- Reaches maximum brightness
- Decreases brightness slowly
- Repeats forever
PWM creates this effect by rapidly switching the LED ON and OFF at different duty cycles.
Higher duty cycle → Brighter LED
Lower duty cycle → Dimmer LED
Real-Life Applications #
Fading LEDs are commonly used in:
- Decorative lighting
- Breathing LED effects
- Gaming keyboards
- Car interior lighting
- Display systems
- Smart home lighting
- Notification indicators
- Electronic toys
Beginner Tips #
- Use only PWM-enabled pins for fading.
- Arduino UNO PWM pins are:
3, 5, 6, 9, 10, 11 - Always use a resistor with the LED.
- If the LED does not fade smoothly, reduce the delay value.
- Smaller delay values create smoother fading.
✔ Challenges / Next Steps #
- Change the fading speed.
- Fade multiple LEDs together.
- Create opposite fading effects using two LEDs.
- Use an RGB LED for color transitions.
- Control brightness using a potentiometer.
- Create breathing light effects like modern devices.
Conclusion #
This project teaches how Arduino can create analog-like effects using PWM.
You learned:
- What PWM is
- How brightness control works
- How
analogWrite()works - How smooth LED fading is created
This project is an important step toward:
- Advanced LED control
- Animation effects
- Smart lighting systems
- Interactive electronics projects
PWM is one of the most useful techniques in Arduino and embedded systems programming.


