Free Shipping on Orders Above ₹499
Same Day Delivery Available in Pune & PCMC
Cash on Delivery (COD) Available
Read Our Shipping Policy
Free Shipping on Orders Above ₹499
Same Day Delivery Available in Pune & PCMC
Cash on Delivery (COD) Available
Read Our Shipping Policy

Blinking LED
3 min read
In this project, we’ll learn how to make an LED blink using an Arduino.
This is one of the most beginner-friendly electronics projects and is often the first project people build while learning Arduino.
The Arduino turns the LED ON, waits for a short time, turns it OFF, and keeps repeating the process continuously.
This simple project helps us understand:
- How Arduino controls output devices
- Basic programming structure
- Timing and delays
- Digital signals (HIGH and LOW)
Even though it looks simple, blinking an LED is the foundation of many advanced electronics and embedded systems projects.
In simple words:
The Arduino acts like a tiny controller that decides when the LED should glow and when it should stop.
Required Components #
- Arduino UNO × 1
- LED × 1 (any color)
- 220Ω Resistor × 1
- Breadboard × 1
- Jumper Wires × several
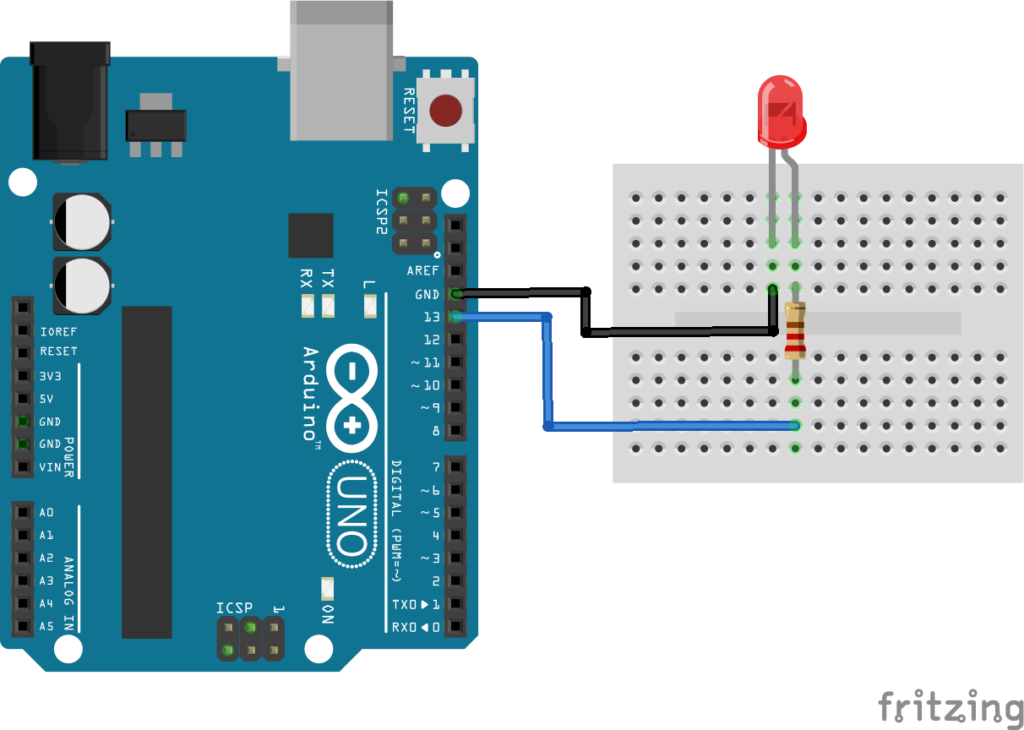
Explanation #
Connect the anode (long leg) of the LED to Arduino digital pin 13 through a 220Ω resistor.
Connect the cathode (short leg) of the LED to GND.
The resistor is important because it limits the current flowing through the LED. Without it, the LED may get damaged.
In the Arduino program, we use: digitalWrite()
to control the LED.
- HIGH turns the LED ON
- LOW turns the LED OFF
We also use: delay()
to pause the program for a specific amount of time.
Example: delay(1000)
means wait for 1000 milliseconds (1 second).
The code inside the loop() function keeps repeating forever, which creates the blinking effect.
In short:
The Arduino gives power to the LED, waits, removes power, waits again, and keeps repeating this cycle.
Program #
void setup()
{
    pinMode(13, OUTPUT);
}

void loop()
{
    digitalWrite(13, HIGH);
    delay(1000);

    digitalWrite(13, LOW);
    delay(1000);
}
Figure 1.2: BlinkingLED Program
Code Explanation #
setup()
pinMode(13, OUTPUT);This tells the Arduino that pin 13 will work as an output pin.
loop()
The loop() function runs continuously forever after the Arduino powers ON.
Turning the LED ON :
digitalWrite(13, HIGH);This sends 5V to pin 13, causing the LED to glow.
Waiting for 1 Second :
delay(1000);The Arduino pauses the program for 1 second.
Turning the LED OFF :
digitalWrite(13, LOW);This removes power from the LED, turning it OFF.
Working Principle #
The Arduino continuously follows this sequence:
- Turn the LED ON
- Wait for 1 second
- Turn the LED OFF
- Wait for 1 second
- Repeat forever
This repeated ON/OFF process creates the blinking effect.
Real-Life Applications #
Blinking LEDs are used in many real electronic systems such as:
- Power indicators
- Warning systems
- Emergency lights
- Vehicle indicators
- Network router lights
- Signal systems
- Electronic toys
- Industrial machine status indicators
Beginner Tips #
- Always use a resistor with an LED.
- The longer leg of the LED is positive.
- If the LED does not glow, check the polarity.
- Make sure all wires are connected properly.
- Try changing the delay value to create different blinking speeds.
Example:
delay(200)→ Fast blinkingdelay(2000)→ Slow blinking
✔ Challenges / Next Steps #
- Make the LED blink faster or slower.
- Add multiple LEDs and blink them in sequence.
- Create a traffic light system.
- Use a button to control the blinking.
- Try fading the LED using PWM.
- Create different blinking patterns.
Conclusion #
This project teaches one of the most important basics of electronics and embedded systems:
Controlling hardware using programming.
After understanding this project, you can start building:
- Automation systems
- Smart devices
- Robots
- IoT projects
- Interactive electronics systems
This small blinking LED project is the first step into the world of electronics and embedded programming.


