Free Shipping on Orders Above ₹499
Same Day Delivery Available in Pune & PCMC
Cash on Delivery (COD) Available
Read Our Shipping Policy
Free Shipping on Orders Above ₹499
Same Day Delivery Available in Pune & PCMC
Cash on Delivery (COD) Available
Read Our Shipping Policy

I2C LCD Display
3 min read
In this project, we’ll learn how to interface an I2C LCD display with Arduino and display text on the screen.
An LCD (Liquid Crystal Display) is commonly used to display information such as:
- Sensor values
- Temperature readings
- Menus
- Status messages
- System information
Normally, a 16×2 LCD requires many Arduino pins, but by using an I2C module, we can control the LCD using only 2 communication pins.
This project introduces important concepts like:
- I2C Communication
- Displaying Text
- External Libraries
- Arduino Output Devices
In simple words:
The Arduino sends data to the LCD, and the LCD displays it as text.
Required Components #
- Arduino UNO × 1
- 16×2 LCD with I2C Module × 1
- Breadboard × 1
- Jumper Wires × several
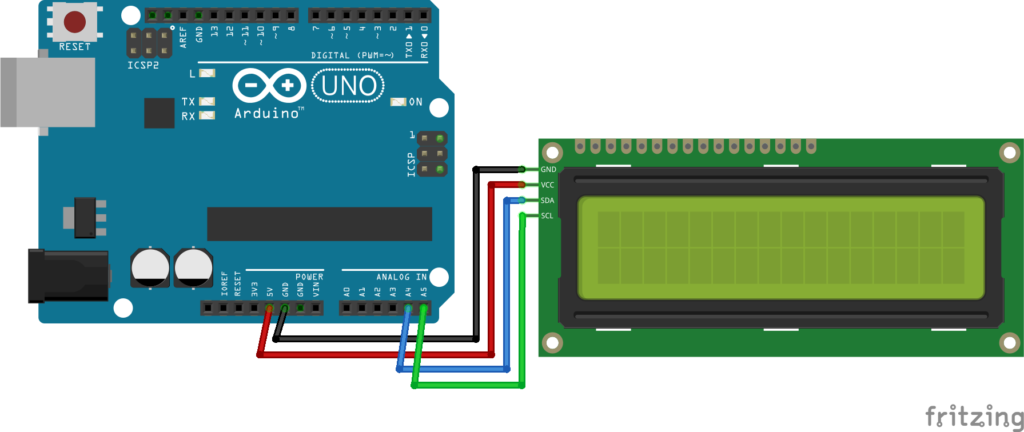
Display Connections #
| I2C LCD Pin | Arduino UNO |
|---|---|
| VCC | 5V |
| GND | GND |
| SDA | A4 |
| SCL | A5 |
Explanation #
The I2C module allows communication using only two wires:
- SDA (Serial Data)
- SCL (Serial Clock)
The Arduino sends commands and text through these two pins.
Every I2C device has an address.
Most LCD I2C modules use:
0x270x3F
The Arduino uses the LCD library to communicate with the display.
In simple words:
Instead of using many wires, the Arduino talks to the LCD through only two communication lines.
Installing the LCD Library #
Before uploading the code:
- Open Arduino IDE
- Click Sketch → Include Library → Manage Libraries
- Search for:
" LiquidCrystal I2C " - Install the library by Frank de Brabander (or a compatible version)
Program #
This simple code displays a welcome message on the LCD.
#include <Wire.h>
#include <LiquidCrystal_I2C.h>

// LCD Address, Columns, Rows
LiquidCrystal_I2C lcd(0x27, 16, 2);

void setup()
{
    lcd.init();
    lcd.backlight();

    lcd.setCursor(0, 0);
    lcd.print("Hello World!");

    lcd.setCursor(0, 1);
    lcd.print("Arduino LCD");
}

void loop()
{

}
Figure 1.2: I2C-LCD Display Program
Code Explanation #
Including Libraries :
#include <Wire.h>
#include <LiquidCrystal_I2C.h>
These libraries allow Arduino to communicate with the I2C LCD.
Creating LCD Object :
LiquidCrystal_I2C lcd(0x27, 16, 2);Where:
0x27= LCD address16= Columns2= Rows
Initializing LCD :
lcd.init();Starts communication with the LCD.
Turning ON Backlight :
lcd.backlight();Turns on the LCD backlight.
Setting Cursor Position :
lcd.setCursor(0,0);Moves the cursor to:
- Column 0
- Row 0
Displaying Text :
lcd.print("Hello World!");Displays text on the LCD.
Working Principle #
The Arduino sends text data through the I2C communication bus.
The LCD receives:
- Commands
- Characters
- Numbers
and displays them on the screen.
The process happens continuously while the Arduino is running.
Real-Life Applications #
I2C LCD displays are used in:
- Digital thermometers
- Home automation systems
- Smart energy meters
- Security systems
- Industrial controllers
- Arduino projects with menus
- Sensor monitoring systems
Beginner Tips #
- Double-check SDA and SCL connections.
- Install the correct LCD library.
- Adjust the contrast screw if the display appears blank.
- Start with simple text before displaying sensor data.
- Use I2C because it saves Arduino pins.
✔ Challenges / Next Steps #
- Display temperature from a thermistor.
- Display potentiometer values.
- Create an LCD menu system.
- Show real-time clock information.
- Build a digital thermometer.
- Display sensor readings from multiple sensors.
Conclusion #
This project teaches how Arduino communicates with an LCD using the I2C protocol.
You learned:
- What I2C communication is
- How an LCD display works
- How to display text and numbers
- How Arduino sends data to external devices
LCD displays are one of the most useful output devices in electronics and are widely used in monitoring, automation, and embedded systems projects.


