Free Shipping on Orders Above ₹499
Same Day Delivery Available in Pune & PCMC
Cash on Delivery (COD) Available
Read Our Shipping Policy
Free Shipping on Orders Above ₹499
Same Day Delivery Available in Pune & PCMC
Cash on Delivery (COD) Available
Read Our Shipping Policy

Traffic Light
3 min read
In this project, we’ll learn how to create a simple traffic light system using an Arduino and three LEDs.
The Arduino will control:
- Red LED → STOP
- Yellow LED → WAIT
- Green LED → GO
The LEDs will glow one after another in the same sequence used in real traffic signals.
This project helps beginners understand:
- Multiple output control
- Timing and delays
- Sequential programming
- Basic automation systems
It also introduces the concept of controlling several devices using a microcontroller.
In simple words:
The Arduino acts like a traffic controller that decides which light should turn ON and for how long.
Required Components #
- Arduino UNO × 1
- Red LED × 1
- Yellow LED × 1
- Green LED × 1
- 220Ω Resistors × 3
- Breadboard × 1
- Jumper Wires × several
Explanation #
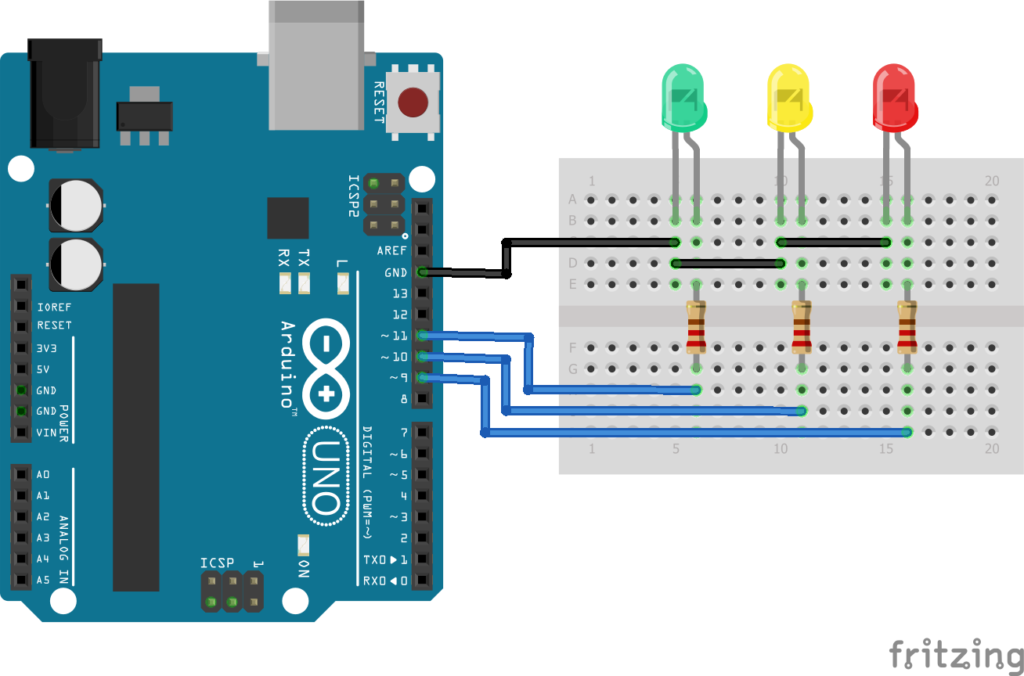
Connect:
- Red LED to digital pin 13
- Yellow LED to digital pin 12
- Green LED to digital pin 11
Each LED must be connected through a 220Ω resistor to protect it from excess current.
Connect all LED negative legs (short legs) to GND.
The Arduino controls each LED one by one using: digitalWrite()
The program follows this sequence:
- Red LED turns ON → Vehicles stop
- Yellow LED turns ON → Prepare to move
- Green LED turns ON → Vehicles move
The: delay()function controls how long each light stays ON.
In short:
The Arduino automatically changes the LEDs in a fixed sequence to simulate a real traffic signal system.
Program #
int redLED = 13;
int yellowLED = 12;
int greenLED = 11;

void setup()
{
    pinMode(redLED, OUTPUT);
    pinMode(yellowLED, OUTPUT);
    pinMode(greenLED, OUTPUT);
}

void loop()
{
    // Red Light
    digitalWrite(redLED, HIGH);
    digitalWrite(yellowLED, LOW);
    digitalWrite(greenLED, LOW);
    delay(5000);

    // Yellow Light
    digitalWrite(redLED, LOW);
    digitalWrite(yellowLED, HIGH);
    digitalWrite(greenLED, LOW);
    delay(2000);

    // Green Light
    digitalWrite(redLED, LOW);
    digitalWrite(yellowLED, LOW);
    digitalWrite(greenLED, HIGH);
    delay(5000);
}
Figure 1.2: Traffic Light Program
Code Explanation #
Defining LED Pins :
int redLED = 13;
int yellowLED = 12;
int greenLED = 11;
These variables store the Arduino pin numbers connected to each LED.
setup() :
pinMode(redLED, OUTPUT);This tells the Arduino that the LED pins will work as output pins.
The same is done for all three LEDs.
Red Light :
digitalWrite(redLED, HIGH);Turns the red LED ON.
delay(5000);Keeps the red light ON for 5 seconds.
Yellow Light :
digitalWrite(yellowLED, HIGH);Turns the yellow LED ON for 2 seconds.
Yellow indicates: “Get ready.”
Green Light :
digitalWrite(greenLED, HIGH);Turns the green LED ON for 5 seconds.
Green indicates: “You can move now.”
Working Principle #
The Arduino continuously repeats this sequence:
- Red LED ON
- Yellow LED ON
- Green LED ON
- Repeat forever
Each LED stays ON for a specific amount of time using delays.
This creates a simple automatic traffic control system.
Real-Life Applications #
Traffic light systems are used in:
- Road intersections
- Railway crossings
- Parking systems
- Smart city systems
- Industrial safety systems
- Pedestrian crossing systems
The same concept is also used in automation and signal control systems.
Beginner Tips #
- Always connect resistors with LEDs.
- Use different LED colors for better understanding.
- Double-check LED polarity before powering the circuit.
- Make sure GND connections are common.
- If an LED does not glow, check the wiring and pin numbers.
✔ Challenges / Next Steps #
- Add a buzzer for pedestrian crossing.
- Add a countdown timer using a 7-segment display.
- Use buttons for pedestrian requests.
- Create a 4-way traffic signal system.
- Add an LDR to automatically control brightness at night.
- Build a smart traffic system using sensors.
Conclusion #
This project teaches how Arduino can control multiple outputs in a sequence.
You learned:
- How to control multiple LEDs
- How timing works in Arduino
- How automation systems operate
- Basic traffic signal logic
This project is a great introduction to:
- Embedded systems
- Automation
- Smart control systems
- Real-world electronics projects
A simple traffic light project is the first step toward building larger automated systems.


