Free Shipping on Orders Above ₹499
Same Day Delivery Available in Pune & PCMC
Cash on Delivery (COD) Available
Read Our Shipping Policy
Free Shipping on Orders Above ₹499
Same Day Delivery Available in Pune & PCMC
Cash on Delivery (COD) Available
Read Our Shipping Policy

Button-Controlled LED
4 min read
In this project, we’ll learn how to control an LED using a push button and Arduino.
When the button is pressed, the LED turns ON.
When the button is released, the LED turns OFF.
This is one of the most important beginner projects because it introduces the concept of digital input and digital output.
The button acts as an input device that sends information to the Arduino, while the LED acts as an output device that responds to that information.
This project introduces important concepts like:
- Digital Input
- Digital Output
- Push Button Working
- Decision Making using
ifStatements - Reading User Input
In simple words:
The button tells the Arduino what to do, and the Arduino controls the LED accordingly.
Required Components #
- Arduino UNO × 1
- LED × 1
- Push Button × 1
- 220Ω Resistor × 1
- 10kΩ Resistor × 1
- Breadboard × 1
- Jumper Wires × several
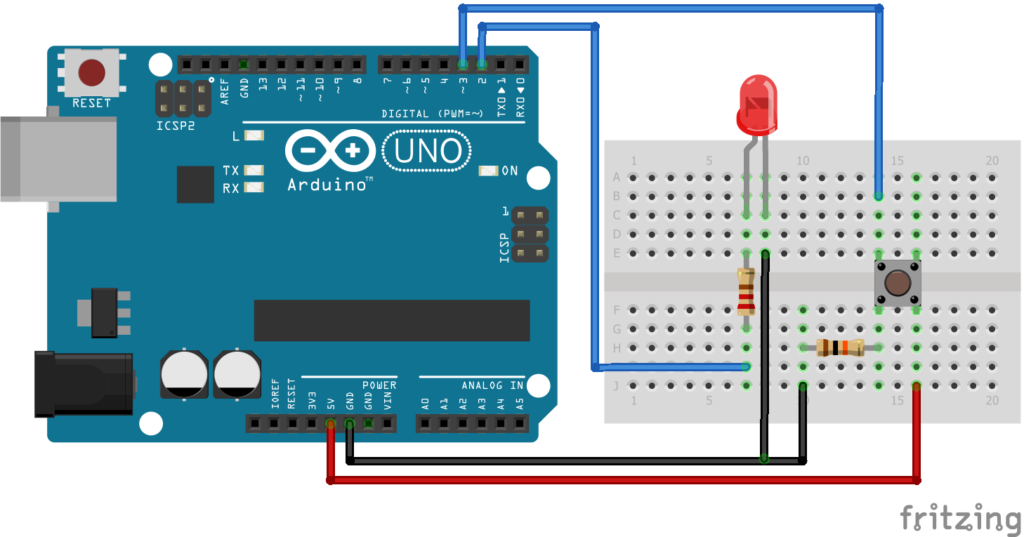
LED Connections #
| LED Pin | Connection |
|---|---|
| Long Leg (+) | Arduino Pin 3 through 220Ω resistor |
| Short Leg (-) | GND |
Button Connections #
| Button Pin | Connection |
|---|---|
| One Side | 5V |
| Other Side | Arduino Pin 2 |
| 10kΩ Resistor | Between Pin 2 and GND |
The 10kΩ resistor acts as a Pull-Down Resistor.
Explanation #
A push button works like a temporary switch.
- Pressed → Circuit connected
- Released → Circuit disconnected
Without a pull-down resistor, the Arduino input pin may receive random signals and behave unpredictably.
The Arduino continuously checks the button state using: digitalRead();
The button can have two states:
| State | Value |
|---|---|
| Pressed | HIGH |
| Released | LOW |
The Arduino then uses: digitalWrite(); to control the LED.
In simple words:
When the button is pressed, the Arduino sees a HIGH signal and turns the LED ON.
Program #
This simple code turns the LED ON only while the button is pressed.
int buttonPin = 2;
int ledPin = 3;

void setup()
{
    pinMode(buttonPin, INPUT);
    pinMode(ledPin, OUTPUT);
}

void loop()
{
    int buttonState = digitalRead(buttonPin);

    if(buttonState == HIGH)
    {
        digitalWrite(ledPin, HIGH);
    }
    else
    {
        digitalWrite(ledPin, LOW);
    }
}
Figure 1.2: Button-controlled Program
Code Explanation #
Defining Pins
int buttonPin = 2;
int ledPin = 3;
Stores the pin numbers connected to the button and LED.
Setting Pin Modes :
pinMode(buttonPin, INPUT);
pinMode(ledPin, OUTPUT);- Button pin → Input
- LED pin → Output
Reading the Button :
digitalRead(buttonPin);Reads whether the button is pressed or not.
Decision Making :
if(buttonState == HIGH);Checks if the button is pressed.
If true:
- LED turns ON
Otherwise:
- LED turns OFF
Upgraded Code #
This upgraded version works like a real ON/OFF switch.
Instead of holding the button continuously:
- First press → LED ON
- Second press → LED OFF
- Third press → LED ON
- And so on…
const int buttonPin = 2;
const int ledPin = 3;

bool ledState = false;
bool lastButtonState = LOW;

void setup()
{
    pinMode(buttonPin, INPUT);
    pinMode(ledPin, OUTPUT);
}

void loop()
{
    bool currentButtonState = digitalRead(buttonPin);

    if(currentButtonState == HIGH && lastButtonState == LOW)
    {
        ledState = !ledState;

        digitalWrite(ledPin, ledState);

        delay(50); // Debounce delay
    }

    lastButtonState = currentButtonState;
}
Figure 1.3: Upgraded version Button-controlled Program
Upgraded Code Explanation #
LED State Variable :
bool ledState = false;Stores whether the LED is currently ON or OFF.
Detecting a Button Press :
if(currentButtonState == HIGH && lastButtonState == LOW);Detects only the moment the button is pressed.
This prevents repeated toggling while the button is being held.
Toggling the LED :
ledState = !ledState;Changes:
- ON → OFF
- OFF → ON
every time the button is pressed.
Debouncing :
delay(50);Buttons do not switch cleanly. They create tiny unwanted signals called bounce.
This delay helps ignore those unwanted signals.
Working Principle #
Simple Version :
- Button Pressed
- Arduino Reads HIGH
- LED Turns ON
- Button Released
- LED Turns OFF
Upgraded Version :
- Button Pressed
- Arduino Detects the Press
- LED State Changes
- LED Remains in that State
- Next Press Changes the State Again
Real-Life Applications #
Button-controlled systems are used in:
- Elevators
- Doorbells
- Home Automation
- Power Buttons
- Remote Controls
- Industrial Control Panels
- Smart Devices
Almost every electronic product uses some form of button input.
Beginner Tips #
- Always use a resistor with the LED.
- Ensure the button is placed correctly on the breadboard.
- Check LED polarity if it does not glow.
- Verify all GND connections.
- If the LED flickers unexpectedly, check the pull-down resistor connection.
✔ Challenges / Next Steps #
- Control multiple LEDs using buttons.
- Create a reaction timer game.
- Add a buzzer with the button.
- Build a password lock system.
- Use a touch sensor instead of a push button.
- Control a relay using a button.
Conclusion #
This project teaches one of the most important concepts in electronics:
Reading an input and controlling an output.
You learned:
- How push buttons work
- How Arduino reads digital signals
- How LEDs are controlled
- How to use decision-making in code
This project forms the foundation of many advanced electronics, automation, and embedded systems projects.


