
No products in the cart.
Skip to main content

Micro Projects
Print
IR Obstacle Sensor with Buzzer
In this project, we’ll learn how to detect an object using an IR Obstacle Sensor Module and play a sound using a Passive Buzzer.
The IR obstacle sensor continuously sends infrared light. When an object comes in front of the sensor, the infrared light reflects back to the receiver, allowing the sensor to detect the object.
When an object is detected:
- The passive buzzer produces a beeping sound.
When no object is detected:
- The buzzer remains OFF.
This project introduces important concepts like:
- Infrared Object Detection
- Digital Input
- Passive Buzzer Control
- Conditional Statements (
if/else)
In simple words:
The sensor acts like a pair of electronic eyes. When something comes in front of it, the Arduino detects it and makes the buzzer beep.
Required Components
- Arduino UNO × 1
- IR Obstacle Sensor Module × 1
- Passive Buzzer × 1
- Breadboard × 1
- Jumper Wires × several
Circuit Diagram
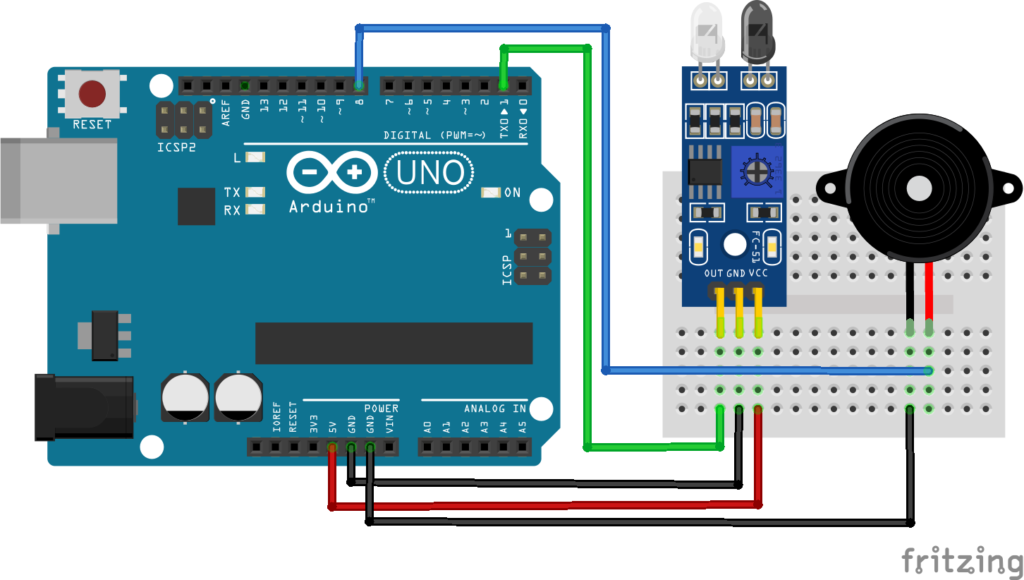
Figure 1.1: IR Obstacle Sensor Circuit Diagram
Connection Details
IR Obstacle Sensor Module
| Sensor Pin | Arduino UNO |
|---|---|
| VCC | 5V |
| GND | GND |
| OUT | D2 |
Passive Buzzer
| Buzzer Pin | Arduino UNO |
|---|---|
| (+) | D8 |
| (-) | GND |
Explanation
The IR obstacle sensor contains:
- An IR LED (Transmitter)
- An IR Receiver
- A Comparator Circuit
- A Sensitivity Adjustment Potentiometer
The IR LED continuously emits infrared light. When an object is placed in front of the sensor, the light reflects back to the receiver.
The module then changes its OUT pin from HIGH to LOW (or LOW to HIGH, depending on the module design). Most common modules have an active LOW output, meaning the OUT pin becomes LOW when an object is detected.
The Arduino continuously checks the sensor output.
If an object is detected:
- The passive buzzer beeps.
If no object is detected:
- The buzzer stays silent.
In simple words:
The sensor is always looking for nearby objects. As soon as it sees one, the Arduino turns the buzzer on.
Program
This simple code makes the passive buzzer beep whenever an object is detected.
⚙️
IR Obstacle.ino
Copy
const int sensorPin = 2;
const int buzzerPin = 8;

void setup()
{
  pinMode(sensorPin, INPUT);
  pinMode(buzzerPin, OUTPUT);
}

void loop()
{
  int sensorState = digitalRead(sensorPin);

  if(sensorState == LOW)   // Object Detected
  {
    tone(buzzerPin, 1000); // 1000 Hz beep
  }
  else
  {
    noTone(buzzerPin);
  }
}
Figure 1.2: IR Obstacle Program
Code Explanation
Defining the Pins :
const int sensorPin = 2;
const int buzzerPin = 8;
These variables store the Arduino pins connected to the sensor and buzzer.
Reading the Sensor :
int sensorState = digitalRead(sensorPin);Reads the digital output from the IR obstacle sensor.
Object Detection :
if(sensorState == LOW)Checks whether an object has been detected.
Most IR obstacle sensor modules output LOW when an object is present.
Generating the Beep :
tone(buzzerPin, 1000);Produces a 1000 Hz sound using the passive buzzer.
Stopping the Sound :
noTone(buzzerPin);Stops the buzzer when no object is detected.
Upgraded Code
This upgraded version changes the beep speed depending on how long the object remains in front of the sensor.
- First detection → Slow beeps
- After 3 seconds → Faster warning beeps
⚙️
Upgraded-Code.ino
Copy
const int sensorPin = 2;
const int buzzerPin = 8;

unsigned long detectTime = 0;
bool objectDetected = false;

void setup()
{
  pinMode(sensorPin, INPUT);
  pinMode(buzzerPin, OUTPUT);
}

void loop()
{
  if(digitalRead(sensorPin) == LOW)
  {
    if(!objectDetected)
    {
      objectDetected = true;
      detectTime = millis();
    }

    if(millis() - detectTime < 3000)
    {
      tone(buzzerPin, 1000);
      delay(300);
      noTone(buzzerPin);
      delay(300);
    }
    else
    {
      tone(buzzerPin, 2000);
      delay(100);
      noTone(buzzerPin);
      delay(100);
    }
  }
  else
  {
    objectDetected = false;
    noTone(buzzerPin);
  }
}
Figure 1.3: Upgraded version IR Obstacle Program
Upgraded Code Explanation
Recording Detection Time :
detectTime = millis();Stores the time when the object is first detected.
Slow Warning :
delay(300);Creates slow beeping for the first 3 seconds.
Fast Warning :
delay(100);After 3 seconds, the buzzer beeps much faster to indicate that the object is still present.
Working Principle
- The IR transmitter continuously emits infrared light.
- An object reflects the infrared light.
- The receiver detects the reflected light.
- The sensor changes its output.
- The Arduino reads the sensor output.
- The buzzer sounds while the object is detected.
- When the object is removed, the buzzer stops.
How to Test
Simple Version
- Upload the code.
- Place an object 2–20 cm in front of the sensor.
- The passive buzzer should produce a continuous tone.
- Remove the object.
- The buzzer should stop.
Upgraded Version
- Upload the upgraded code.
- Place an object in front of the sensor.
- The buzzer should beep slowly.
- Keep the object in front of the sensor for more than 3 seconds.
- The buzzer should start beeping faster.
- Remove the object to stop the buzzer.
Troubleshooting
Sensor Always Detects an Object
- Adjust the blue potentiometer on the sensor module.
- Remove shiny or reflective objects nearby.
- Check the wiring.
Sensor Does Not Detect Anything
- Make sure the sensor is connected to 5V.
- Verify that the OUT pin is connected to D2.
- Try adjusting the sensitivity potentiometer.
- Test with a white object placed close to the sensor.
Buzzer Does Not Produce Sound
- Make sure you are using a Passive Buzzer.
- Check the buzzer polarity.
- Verify the buzzer is connected to pin D8.
- Ensure the GND connection is secure.
Real-Life Applications
IR obstacle sensors are commonly used in:
- Obstacle Avoiding Robots
- Parking Assistance Systems
- Automatic Doors
- Object Counters
- Conveyor Belt Detection
- Security Alarm Systems
- Smart Dustbins
- Industrial Automation
Beginner Tips
- Adjust the sensor’s potentiometer to set the detection distance.
- Keep the sensor lens clean for better performance.
- Very dark or transparent objects may be harder to detect.
- Avoid direct sunlight, as strong infrared light can affect detection.
- Test the sensor with different objects to understand its range and limitations.
✔ Challenges / Next Steps
- Display the detection status on an I2C LCD.
- Add red and green LEDs for visual indication.
- Build an obstacle-avoiding robot.
- Create a parking sensor with different beep speeds based on distance (using an ultrasonic sensor for true distance measurement).
- Connect a relay to trigger an alarm or other device.
- Send detection data to a computer using the Serial Monitor.
Conclusion
This project demonstrates how an IR Obstacle Sensor Module can detect nearby objects and trigger a Passive Buzzer.
You learned:
- How an IR obstacle sensor works.
- How to read a digital sensor.
- How to control a passive buzzer with
tone()andnoTone(). - How to create simple object detection and warning systems.
This project is a great introduction to sensors and is commonly used as the foundation for robots, security systems, and automation projects.
Table of Contents
