
No products in the cart.
Skip to main content

Micro Projects
Print
IR Remote & TSOP38238
In this project, we’ll learn how to control an LED using an IR (Infrared) remote and a TSOP38238 IR receiver with Arduino.
Instead of pressing a physical button, we’ll use an IR remote to send wireless commands to the Arduino.
When a button on the remote is pressed:
- The TSOP38238 receiver detects the infrared signal.
- The Arduino decodes the received signal.
- The LED turns ON or OFF depending on the button pressed.
This project introduces important concepts like:
- Infrared (IR) Communication
- Wireless Control
- Digital Input
- IR Signal Decoding
- External Libraries
In simple words:
The remote acts as a wireless controller, the TSOP38238 receives the signal, and the Arduino controls the LED.
Required Components
- Arduino UNO × 1
- LED × 1
- TSOP38238 IR Receiver × 1
- IR Remote Control × 1
- 220Ω Resistor × 1
- Breadboard × 1
- Jumper Wires × several
Circuit Diagram
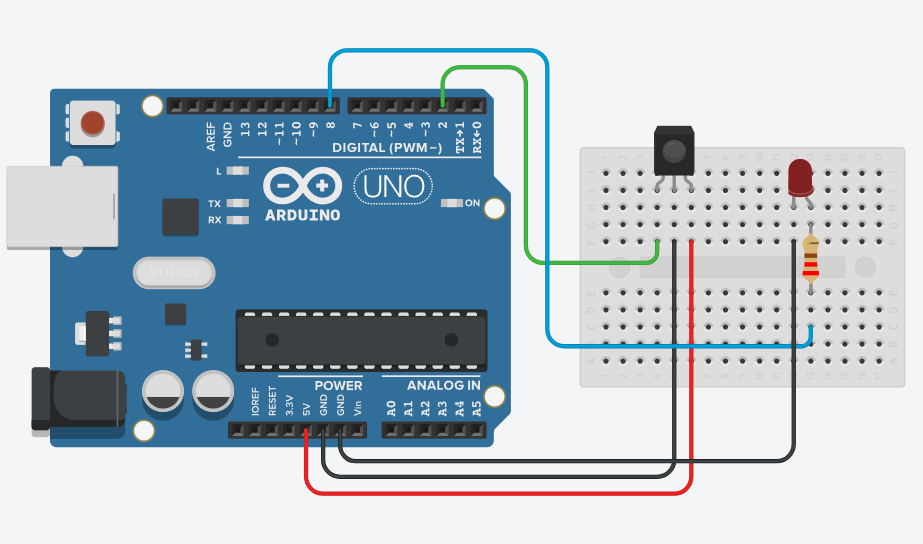
Figure 1.1: IR receiver Circuit Diagram
Connection Details
TSOP38238 Connections
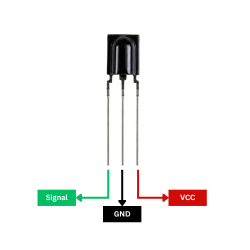
| TSOP38238 Pin | Arduino UNO |
|---|---|
| OUT | D2 |
| GND | GND |
| VCC | 5V |
LED Connections
| LED Pin | Arduino UNO |
|---|---|
| Long Leg (+) | Pin 8 through 220Ω resistor |
| Short Leg (-) | GND |
Explanation
The IR remote sends infrared light pulses whenever a button is pressed.
The TSOP38238 receiver is designed to detect infrared signals with a 38 kHz carrier frequency, which is commonly used by TV and appliance remotes.
When the receiver detects a signal:
- It converts the infrared pulses into digital data.
- The Arduino decodes the received signal.
- The decoded button code can then be used to control LEDs, motors, displays, relays, and many other devices.
In this project:
- One remote button turns the LED ON.
- Another button turns the LED OFF.
Installing the IR Library
Before uploading the code:
- Open Arduino IDE.
- Click Sketch → Include Library → Manage Libraries.
- Search for:
IRremote
- Install the Arduino-IRremote library by Armin Joachimsmeyer (Arduino-IRremote).
Program
Before controlling the LED, you need to find the hexadecimal code for each button on your remote.
⚙️
Find-Button-code.ino
Copy
#include <IRremote.hpp>

#define IR_RECEIVE_PIN 2

void setup()
{
  Serial.begin(9600);

  IrReceiver.begin(IR_RECEIVE_PIN, ENABLE_LED_FEEDBACK);

  Serial.println("Press any button...");
}

void loop()
{
  if (IrReceiver.decode())
  {
    Serial.print("HEX Code: ");
    Serial.println(IrReceiver.decodedIRData.decodedRawData, HEX);

    IrReceiver.resume();
  }
}
Figure 1.2: Find Button HEX Code Program
Code Explanation
Starting the IR Receiver :
IrReceiver.begin(IR_RECEIVE_PIN, ENABLE_LED_FEEDBACK);Starts the TSOP38238 receiver on pin 2.
Reading a Button :
IrReceiver.decode()Checks whether a remote button has been pressed.
Printing the Button Code :
IrReceiver.decodedIRData.decodedRawDataDisplays the hexadecimal code of the pressed button on the Serial Monitor.
Example:
HEX Code: F708FF00Write down the codes for:
- ON button
- OFF button
You’ll use them in the next program.
Upgraded Code
Replace the hexadecimal values below with the codes from your own remote.
⚙️
Upgraded-Code.ino
Copy
#include <IRremote.hpp>

#define IR_RECEIVE_PIN 2

const int ledPin = 8;

// Replace these with your remote's button codes
#define LED_ON_CODE  0xF708FF00
#define LED_OFF_CODE 0xE31CFF00

void setup()
{
  pinMode(ledPin, OUTPUT);

  Serial.begin(9600);

  IrReceiver.begin(IR_RECEIVE_PIN, ENABLE_LED_FEEDBACK);

  Serial.println("IR LED Control Ready");
}

void loop()
{
  if (IrReceiver.decode())
  {
    uint32_t code = IrReceiver.decodedIRData.decodedRawData;

    Serial.print("Received: ");
    Serial.println(code, HEX);

    if(code == LED_ON_CODE)
    {
      digitalWrite(ledPin, HIGH);
      Serial.println("LED ON");
    }

    if(code == LED_OFF_CODE)
    {
      digitalWrite(ledPin, LOW);
      Serial.println("LED OFF");
    }

    IrReceiver.resume();
  }
}
Figure 1.3: LED ON/OFF Controlled Program
Upgraded Code Explanation
Defining Button Codes :
#define LED_ON_CODE
#define LED_OFF_CODE
Store the hexadecimal values for the ON and OFF buttons.
Reading the Remote :
uint32_t code = IrReceiver.decodedIRData.decodedRawData;Stores the received IR code.
Turning the LED ON :
digitalWrite(ledPin, HIGH);Turns the LED ON when the correct button is pressed.
Turning the LED OFF :
digitalWrite(ledPin, LOW);Turns the LED OFF when the correct button is pressed.
Working Principle
- Press a button on the IR remote.
- The remote sends an infrared signal.
- The TSOP38238 receives the signal.
- The Arduino decodes the button code.
- If the code matches the programmed value:
- LED turns ON or OFF.
This process repeats continuously while the Arduino is running.
How to Test
Step 1
- Upload the first code.
- Open the Serial Monitor.
- Set the baud rate to 9600.
- Press different buttons on the remote and note the hexadecimal codes.
Step 2
- Replace:
LED_ON_CODEandLED_OFF_CODEwith your own button codes. - Upload the upgraded code.
Step 3
- Press the selected buttons.
- The LED should turn ON and OFF.
Troubleshooting
No codes appear in the Serial Monitor
- Check the TSOP38238 wiring.
- Verify the correct COM port is selected.
- Confirm the baud rate is set to 9600.
- Make sure the Arduino-IRremote library is installed correctly.
LED does not respond
- Verify the button codes.
- Check LED polarity.
- Check the resistor connection.
- Confirm the LED is connected to the correct Arduino pin.
Real-Life Applications
IR remote control systems are used in:
- Television remotes
- Air conditioners
- DVD players
- Home automation
- Smart lighting
- Robot control
- Wireless appliance control
- Multimedia systems
Beginner Tips
- Always find your remote’s button codes first.
- Different remote brands produce different hexadecimal codes.
- Point the remote directly at the TSOP38238 for the best results.
- Avoid direct sunlight or strong fluorescent lighting during testing, as they can interfere with IR reception.
- Press buttons briefly to avoid repeat codes.
✔ Challenges / Next Steps
- Control multiple LEDs with different buttons.
- Build an IR-controlled home automation system.
- Control a servo motor using the remote.
- Display the pressed button on an I2C LCD.
- Build an IR remote-controlled menu system.
- Control relays to switch household appliances.
Conclusion
This project teaches how Arduino communicates with an IR remote using a TSOP38238 receiver.
You learned:
- How infrared communication works.
- How the TSOP38238 receives IR signals.
- How to decode remote button codes.
- How to control an LED wirelessly.
IR communication is widely used in home appliances, automation systems, and embedded electronics, making it an excellent project for beginners who want to explore wireless control.
Table of Contents
