
No products in the cart.
Skip to main content

Micro Projects
Print
Temperature Sensor (Thermistor)
In this project, we’ll learn how to measure temperature using a thermistor and Arduino.
A thermistor is a special type of resistor whose resistance changes according to temperature.
There are two main types of thermistors:
- NTC (Negative Temperature Coefficient)
- PTC (Positive Temperature Coefficient)
In this project, we commonly use an NTC thermistor, where:
- Temperature increases → Resistance decreases
- Temperature decreases → Resistance increases
The Arduino reads these changing values and converts them into temperature readings.
This project introduces important concepts like:
- Temperature Sensing
- Analog Input
- Voltage Divider Circuit
- Sensor Reading
- Real-World Data Measurement
In simple words:
The thermistor senses temperature changes, and the Arduino converts those changes into readable values.
Required Components
- Arduino UNO × 1
- NTC Thermistor × 1
- 10kΩ Resistor × 1
- Breadboard × 1
- Jumper Wires × several
Circuit Diagram
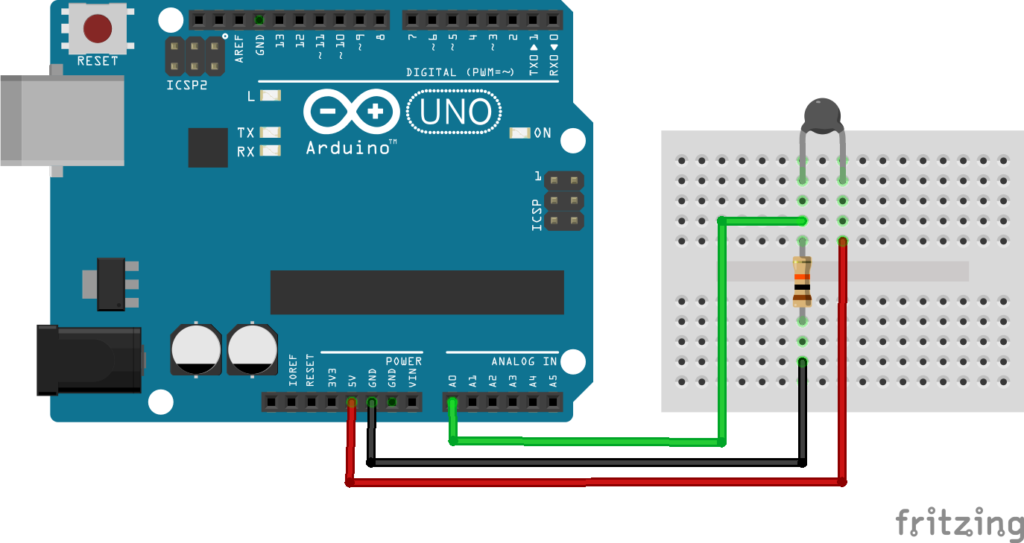
Figure 1.1: Thermistor Circuit Diagram
Explanation
The thermistor is connected in a voltage divider circuit along with a 10kΩ resistor.
Connections:
- One side of the thermistor → 5V
- Other side → Arduino analog pin A0
- 10kΩ resistor connected between A0 and GND
This arrangement creates a changing voltage depending on temperature.
As temperature changes:
- Thermistor resistance changes
- Voltage changes
- Arduino reads different analog values
The Arduino reads this voltage using: analogRead()
The analog value is then converted into resistance.
After that, the Arduino uses the Steinhart-Hart equation to calculate the temperature in Celsius.
In simple words:
The Arduino measures how much the thermistor resistance changes and converts it into temperature.
Program
⚙️
Thermistor.ino
Copy
#include <math.h>

int thermistorPin = A0;

float resistance;
float temperature;

const float seriesResistor = 10000.0;
const float nominalResistance = 10000.0;
const float nominalTemperature = 25.0;
const float betaCoefficient = 3950.0;

void setup()
{
    Serial.begin(9600);
}

void loop()
{
    int adcValue = analogRead(thermistorPin);

    resistance = seriesResistor * (1023.0 / adcValue - 1.0);

    temperature = resistance / nominalResistance;
    temperature = log(temperature);
    temperature /= betaCoefficient;
    temperature += 1.0 / (nominalTemperature + 273.15);
    temperature = 1.0 / temperature;
    temperature -= 273.15;

    Serial.print("Temperature: ");
    Serial.print(temperature);
    Serial.println(" °C");

    delay(1000);
}
Figure 1.2: Thermistor Program
Code Explanation
Including Math Library:
#include <math.h>This library is needed because the code uses logarithm calculations for temperature conversion.
Thermistor Pin:
int thermistorPin = A0;The thermistor is connected to analog pin A0.
Thermistor Constants:
const float betaCoefficient = 3950.0;This value is used to calculate temperature accurately.
Different thermistors may have different beta values.
Reading Analog Value:
int adcValue = analogRead(thermistorPin);The Arduino reads the voltage from the thermistor circuit.
The value ranges from:
0→ 0V1023→ 5V
Calculating Resistance:
resistance = seriesResistor * (1023.0 / adcValue - 1.0);This converts the analog value into thermistor resistance.
Calculating Temperature:
temperature = log(temperature);The Arduino uses the Steinhart-Hart equation to calculate accurate temperature values.
This is one of the most commonly used thermistor equations in electronics.
Printing Temperature:
Serial.println(" °C");The calculated temperature is displayed on the Serial Monitor.
Working Principle
The thermistor changes resistance according to temperature.
This resistance change changes the voltage in the voltage divider circuit.
The Arduino:
- Reads the voltage
- Converts it into resistance
- Uses a mathematical equation
- Calculates temperature in Celsius
This process repeats continuously.
Real-Life Applications
Thermistors are widely used in:
- Digital thermometers
- Air conditioners
- Refrigerators
- Battery temperature monitoring
- CPU cooling systems
- Medical devices
- Industrial automation
- Automotive electronics
Beginner Tips
- Use a proper 10k NTC thermistor for accurate results.
- Loose breadboard connections may cause unstable readings.
- Different thermistors may require different beta values.
- Avoid holding the thermistor too tightly during testing.
- Small fluctuations in readings are normal.
✔ Challenges / Next Steps
- Display temperature on an LCD.
- Add a buzzer for high-temperature alerts.
- Create an automatic cooling fan system.
- Send temperature data to a mobile phone using Bluetooth.
- Build a smart room temperature monitor.
- Convert readings into Fahrenheit.
Conclusion
This project teaches how Arduino reads real-world temperature using a thermistor sensor.
You learned:
- How a thermistor works
- How analog sensing works
- How temperature is calculated
- How resistance changes with temperature
This project is an important step toward building:
- Smart monitoring systems
- Environmental sensors
- IoT temperature systems
- Automation projects
Temperature sensing is one of the most important and widely used applications in electronics and embedded systems.
Table of Contents
